Showing posts with label ornament. Show all posts

Wednesday, October 07, 2009

How to Photograph Reflective Ornaments


Last year when I listed my Pocket Mirror Christmas ornaments in my Etsy shop I was able to hang them on my Christmas tree to take pictures of them. I wanted to list some a little earlier this year, though, and since I don't have my Christmas tree up yet, I had to think of another way to photograph them.

I've detailed in an earlier post my creative solution to product photography with a limited budget and small living space. I started with the same basic plan to shoot in front of the glass door leading to the deck of my town house. I get good, open lighting for several hours of the day there.

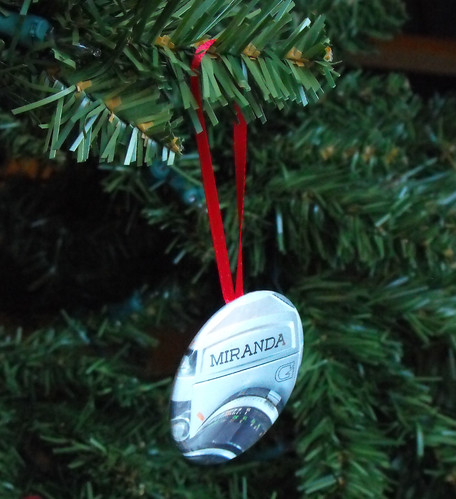
I used pieces of foamboard again, standing one scored board on end and laying another one across the top. I grabbed one of my pin-back button parts and stuck it in the top board and draped the ribbon of the ornament over it, letting it hang freely, like this:


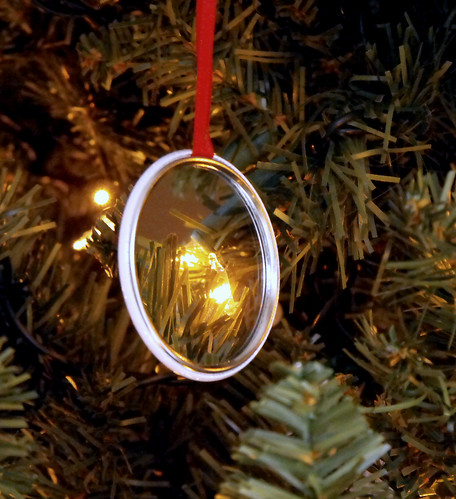
Since these ornaments are highly reflective it takes a little creative positioning to compensate for that. I've found that a strategically place black board can take care of the problem. Watch what the light is doing and how the reflection changes as you reposition this black board in front of the item you're shooting, varying the angle as necessary. Don't worry if you have to get a little of the foamboards in the picture because you can crop that out later.


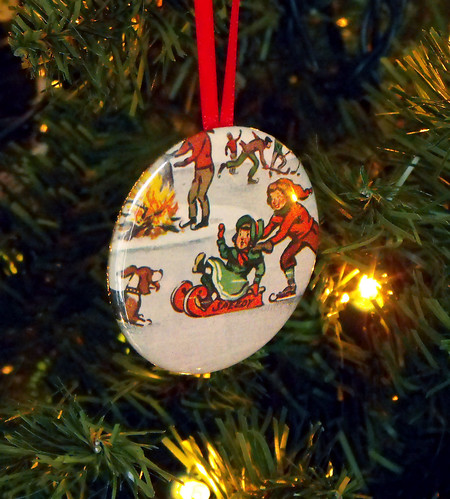
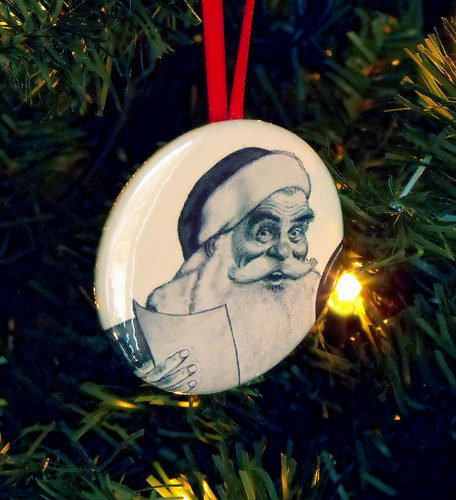
I think these pictures turned out pretty well. What do you think? These ornaments were all made with Christmas print fabrics I've collected. I'll be listing these and others in my Etsy shop soon.


Monday, December 08, 2008

A Mirror On Your Christmas Tree

I came up with a fun thing to do with my pocket mirrors this Christmas...hang them on your Christmas tree! Here's the front and back of one that's my original design:


I've saved a few special, one of a kind, images I'm recycling from vintage magazines published around Christmas and they'll be perfect for these. Here' my first two:


I have more vintage Christmas ones still to come, as well as something special for collectors of vintage cameras or guitars, or for you favorite computer geek (because I like those things, too). Here's one I made with a picture I took of the Miranda G 35mm slr I got years ago from my dad (I blogged about this camera rehere):


I'll be happy to make you some custom pocket mirror ornaments to hang on your tree. I can make you one that says Merry Christmas to someone special or use your photo to make one. Just leave me a comment here or a convo on Etsy and I'll fix you right up!

Thursday, September 25, 2008

Summer/Fall projects

A cool breeze is blowing at my house today and fall is definitely in the air. But this project I just completed for an Etsy customer reminds me of summer.

When she first contacted me she said she wanted a special pocket mirror to give to her daughter. She said she loves pink and elephants and butterflies and glitter.

Two thoughts occurred to me:

1. I'm knee-deep in a custom order of 15 Mini-Puzzle Ball Christmas Ornaments and don't have a lot of time for graphic design brainstorming right now.

2. "Girly" does not describe me. I'm about as "tomboy" as you can get and have been so for all of my 50 years on this planet.

I decided to call in reinforcements.

I told the CafeMom Etsy Moms Street Team about this because I knew several members are talented graphic artists who might be interested in this project. After gathering some designs from the ladies and submitting several to the customer, this one was her favorite.


I pressed it by hand with my professional button machine and materials and covered it with mylar and turned it into the pocket mirror pictured here.


You should check out the Etsy shop of the Cafemom Etsy Mom who helped me with this project, mamaslittlemonkeys for some great stuff for babies, kids and their mamas. She's also opened a second Etsy shop, fleurdeink, for some really special flower pens she makes:


If you're a member of CafeMom.com and also an Etsy seller, stop by and see our CafeMom Etsy Moms Group sometime.

Wednesday, September 10, 2008

Christmas is Coming!

I got a big order for 15 of my Mini-Puzzle Ball Christmas Ornaments! That's the good news. Now the challenge will be finding the time to make them all!

So far...so good!


Friday, November 30, 2007

Hot Pink Christmas

I'm thinking about some new color combinations for my Christmas Puzzle Balls, so I thought I'd try one out on a friend of mine. Here's what she (and her daughter) said about it:

Here is a few (not really great) pics of the kid with her favorite Christmas Ornament.
It's a mini puzzle ball made by Donna Pool.
She can take it off the tree and it comes apart in three peices and she has to figure out how to put it back together.

She really loves it!

She's so excited b/c of all the ornaments on the tree... she knows that that one... she can take it off and play with it!


So what do you think? Leave a comment and tell me if you think I should make more like this to post in my Etsy shop. I'd love to hear what you think!

Monday, November 19, 2007

And There I Am!

The Eco Etsy blog has been featuring the different Etsy sellers who are participating in the 20% off sale running through Nov. 30th. This time, it's my turn! Check it out:

http://ecoetsy.blogspot.com/2007/11/eco-etsy-team-sale-malinb-and-donna.html


I think this is my personal favorite among the standard size Puzzle Ball ornaments I currently have in my shop:


And this is my favorite among the Mini Puzzle Balls:


If you see anything you're interested in, better get it while you can. These take a while to make and if your favorite design sells out before Christmas, I may or may not have time to make you another one!

Friday, August 10, 2007

Do Overs

I started another Mini-Puzzle Ball a couple of days ago, this time cutting out pieces for two different ones at the same time. That way I've got another one ready to go when the first one is finished.

All those tiny stitches can actually be a sort of therapy for me. It's as though I'm channeling all my perfectionist tendencies into those stitches. My living room/crafting workshop is a disaster area...but, by golly, those stitches sure are neat, aren't they!?!

It used to be that I would sew all the little sections together before starting to trim the seams, turn them inside out and stuff them all, then assemble the ball. These days, though, particularly with the tiniest ones, I've decided to trim, turn & stuff the first section I finish. That gives me a better idea of what the finished product will look like.

This time, though, I trimmed it a little too close. When I used the pointed end of a pair of scissors to work the corners out, I had a blow-out. I had trimmed the seam too close and there just weren't enough threads left to hold it together there. Here's what I mean:


Determined to keep from making the same mistake again, I picked up the next pieces of fabric in my prepared stack and kept stitching. After I had successfully completed the second attempt at my first section of this puzzle ball, I cut out two more pieces of fabric to replace the ones I'd wasted on my first attempt. Of course, with a project this small...it's not much waste!


When it's finished, this Mini-Puzzle Ball will be available in my etsy shop.