Showing posts with label etsy. Show all posts

Thursday, May 07, 2015

A Blue Teddy Bear

A few months ago I got a message on Etsy from someone who was looking for a blue teddy bear. Alyssa said she worked for an online retailer that likes to go above and beyond for their customers. She and her team had searched for months trying to find a very special blue teddy bear like the one that had been lost by a little boy with autism. The boy's mother had tried to replace it with something similar but it just wasn't quite the same. They hadn't been able to locate it anywhere and now Alyssa wondered if I could make one like it.

I could tell from the photo she sent that it was very different from the teddy bears I make but I said I wanted to help and I'd be glad to look around and see if I could find another Etsy artist who could make one. I started right away and after finding some similar handmade bears I remembered I'd seen many of the toys my daughters grew up with listed on eBay so I decided to look there. I thought I might at least find a similar one that would tell me what company had made it.

After some searching... there it was. It looked exactly like the bear in the photo. Same blue fur, same floppy look, same pink nose... it was the same bear.

I sent the link to the teddy bear to Alyssa and she was ecstatic! She said, "You have my entire team in awe! We have been searching for at least two months! Thank you for the bottom of my heart! Can I please have your email address I would love to send you and your family some Zappos.com friends and family coupons. Thank you, thank you, thank you, a million times more!!!"

Oh, that online retailer!


What they didn't know was that I'd just begun searching for a job for the first time in decades and had been feeling pretty down about my prospects. It made me feel really good to know that I had made a difference for Alyssa and her team and especially for that little boy.


A few days later I heard from Alyssa again. The blue teddy bear had arrived and it was perfect! They had decided to tell the story of how this had all come together for their customer and since I was a big part of it, they wanted to include me. Would I be interested in allowing someone to come to my home for a video interview?

Well, why not?

So, besides my new friend, Alyssa, I now have a new friend, Sara, who came to my home to ask about what I do and how I ended up finding a very special blue teddy bear for a very special boy.


I guess Zappos.com knows what I know from selling on Etsy. It's not just Customer Service. It's a relationship.


Tuesday, July 08, 2014

Teddy Bears For Mike


Mike's Teddy Bears photo MikeBearsGif50percent_zps387dca82.gif


This is the story of some very special custom handmade teddy bears that I made for my friend, Lori. When Lori's brother passed away suddenly last year she asked if I could make some of my custom teddy bears out of his old t-shirts as memorial gifts to all of his siblings, nieces and nephews. I told her I would be honored. 

It took me about six months to make fourteen teddy bears. It's a big family. Fortunately, I had a few months to get them all done.

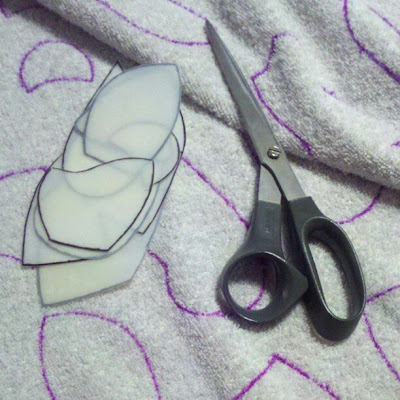
Lori lives in Alberta, Canada and I live in Maryland, so we had to do all this long distance. Lori picked out the first t-shirt I would use and mailed it to me. It had a big beautiful dragon on it and I saw lots of possibilites for the bears. We met via Skype so I could show her how my pattern pieces could be placed so that different parts of the design ended up on different parts of the bears. A few hours later I had a pile of tiny t-shirt scraps and nine stacks of teddy-bears-to-be and I got busy sewing.


I took photos of each teddy bear in progress and shared them on Instagram and Twitter so my friends could keep track of the story of this family of bears as I went along. 

Hint: If you're planning to do a lot of hand sewing, take care of your hands. Keep your favorite lotion nearby. And I highly recommend leather thimbles.


When I was close to finishing the first nine bears Lori sent me another shirt for the remaining five bears, a white shirt with an argyle pattern and an interesting texture. Again, I had fun choosing which parts of the design would end up on what parts of the bears. 


All fourteen teddy bears were completed and delivered in time for Lori to distribute them at the Brown Family Reunion last month. She lined them all up on a bed and brought everyone in to see them and choose the one they wanted to keep. Lori says, "Losing Mike was devastating to our family, and missing him is part of every day. Having a small piece of him to hold onto, with these beautiful bears, is a comfort.... The bears are another way to heal our broken hearts." 


You can go to my Flickr gallery of Mike's Teddy Bears and see a photo journal of this project with views of the teddy bears in progress and all four sides of each finished bear. 


and let me know if you have a special project you'd like me to make for you.


Sunday, March 17, 2013

When Irish Bears Are Smiling


I think my friend, Ali, is the most Irish friend I know so I wasn't at all surprised when she asked me about a special teddy bear project. Ali has ordered several of my handmade teddy bears before so she was familiar with my work. She also knows I enjoy a challenge.

Ali sent me her favorite old hoodie and ordered two teddy bears to be made with it. She's lost a lot of weight during the past year and can't wear the hoodie anymore, but she hated to just get rid of it. Turning it into teddy bears seemed to be a good way of keeping the old favorite around. The extra challenge was that she wanted me to take the shamrock off the hoodie and put it on one of the bears.

The soft green knit of the hoodie was easy to work with. I trimmed the fabric close to the shamrock and appliqued it to the back of the bear. Since the shamrock was so large it fit better on the back, which is flatter, rather than sewing it to the more rounded belly of the bear, which might pucker or distort the shape. For the second bear, I found a small gold shamrock patch and ironed it on the front. The finishing touch for each bear was blue eyes, just like Ali's.

So, Happy St. Patrick's Day! Enjoy the pictures!


If you'd like me to make keepsake teddy bears for you
 leave a comment here, find me on Twitter
or check out my Etsy shop: 


Monday, February 18, 2013

Two Special Bears

This is the story of two very special bears. They were born the day my Twitter friend, Linda, asked if I could make teddy bears from an old bathrobe. I'd been making bears for years with recycled clothing so I said, "Sure, I can do that!" Then she told me what she wanted to do.

Linda and her sister lost their father about a year ago. I remember how we had talked on Twitter about the loss of a parent and our group of friends gathered around to encourage and uplift her.

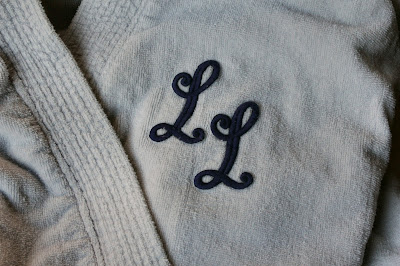
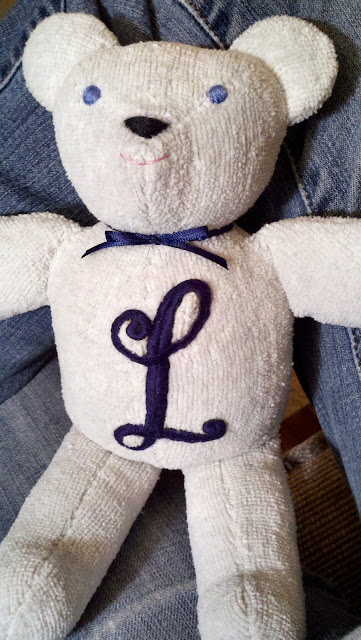
Linda told me that she had her father's favorite robe with his initials on it and she wondered if I could use it to sew two teddy bears, one for her and one for her sister, and put one initial "L" on each bear. She even emailed me a photo of her father so the blue eyes of the bears would match his. I told her I would be honored to do a project like that. 

I decided to complete the construction of both bears before trimming the initials close and turning the edges under to sew them on. I saved the faces for last, as I always do, and added ribbons around the neck matching the color of the initials. 

When Linda received the completed teddy bears she tweeted me and said, "All I can say is...wow...amazing...speechless...they are just beautiful bears!" She also said her mother was "blown away". I do love a happy customer!

You can click on these photos to see them full size:


If you'd like me to make custom teddy bears for you
leave a comment and tell me what you have in mind
or you can find them in my Etsy shop.


Tuesday, April 03, 2012

Buried Treasure


Cameras and photos, books and magazines, radios, toys, etc. can clutter an attic, tell the story of a life, or decorate a newlywed's budget apartment. Is it just dusty old stuff to you or is it buried treasure?

I often tell people that our house is decorated in a combination of early College Apartment and Late Salvation Army. I hope that when friends come to visit they see evidence of creative lives well lived and assume that each oddly placed object that doesn't seem to match anything holds a story all it's own. That would be a correct assumption. Sometimes the story is about whatever happened to distract us from actually finding a better place to put said object, but that is the story of our lives.

From time to time as our daughters have grown we have used the objects we've gathered to tell them the story of our lives or of others we have known and loved and give them an appreciation for history. They knew exactly how my mother sewed clothes for me because I used the same cast iron Singer sewing maching (no zig zag stitch included) to sew clothes for them. They saw the young woman who would become my grandmother as I scanned my grandfather's 3x5 black & white negatives and saved them to my computer's hard drive for retouching and archiving later. They followed us, sometimes impatiently, as we wandered through flea markets and antique stores, recognizing items that filled our childhood homes, occasionally adding something to our collection.

I've been gathering vintage cameras and photography equipment for years. I love picking up an old camera, feeling the weight of it in my hands, looking at it from the photographer's point of view. I can see all the steps  a photographer took to record babies' first smiles, first days of school and high school graduations. Some cameras in my collection once belonged to family members, some I've picked up just because I liked the look of them.  My older daughter remembers watching me develop pictures of her in my homemade darkroom using an enlarger that had belonged to my father.

As older relatives have passed away and family members have downsized, our collection has grown and we are making choices about what we really want to keep and what must go to someone else who will value it and make a place for it in their home. We're getting ready to open a shop of vintage items on Etsy. I've been busy for weeks now, sorting and photographing things we'll be offering for sale, writing descriptions that tell their story and getting ready to let them go. Some we've had all our lives, some were just passing through. The shop will be ready to go public sometime in the next week or so. I hope you'll check it out and share it with all your friends, too.

In the meantime, here's a photo of an old type tray I picked up at a flea market years ago. I started displaying a few small souvenirs and things in it and slowly filled it up. Each one tells a story, but they don't take up much space. Feel free to leave a comment and ask me about them and maybe I'll tell you the story in my next blog entry.


Thursday, April 01, 2010

Giblet, Part One

Once upon a time I was a doodler. I’d leave my doodles and drawings on book covers and class notes, school binders and church bulletins, and even paper tablecoths at Wednesday night suppers. No paper surface was safe, it would seem and no challenge went unmet. A shout across the classroom of “Hey, Donna, can you draw (fill in the blank)” would be answered with “Sure!” While I seldom guaranteed the results, I was always willing to try!

But somewhere along the way I became discouraged when I saw so many artists whose talent was much greater than my own. Then I got distracted by life and kids and responsibilities and I stopped drawing, except for the occasional poster or logo design for a church event. I put my artistic efforts into making gifts for family & friends and some of those things eventually found their way into my Etsy shop, which my daughter encouraged me to set up a few years ago.

Then I started doodling with a graphics program on my computer and a few months ago I put some doodles in my Zazzle shop. Much to my surprise I’ve made some sales there and I’m having a lot of fun coming up with new designs, particularly for my fellow soap opera fans.

I got a special request a few months ago from one of my soap opera internet buddies. She’d planned a special event with a friend who had an unusual nickname, “Giblet” and wondered if I could draw a pig to put on a t-shirt. I didn’t ask for the details behind the nickname or the significance of the pig, I just told her I’d give it a try. Here’s what I came up with.


She said…” Love the pig - could we put him in a blanket sitting in a chair?” So I did.


“Oh, you are SOO on the right track that my dog looked at me funny when I laughed out loud!!!”

I told her, “Oh, gee...in the ‘Why Didn't I Think of That’ Department.... I was just telling my husband about your reaction to this sketch and he said, ‘If you could make the blanket wrap around the pig you'd have a pig in a blanket!’” She thought that was an excellent idea, so here’s the final sketch (after scanning it and cleaning it up a bit in my graphics program)….


She said “That is PERFECT! That's the one! Thank you so much! A pig in a blanket!”

I decided to add color to the drawing to make it match the color of the text design she’d decided on, too. Here’s the final edition:


And here it is on the t-shirt, with the text we worked out together. Any resemblance to the Guiding Light logo is strictly intentional! (You can click on the shirt to see it in my Zazzle shop)....


And just for grins, I put it on some other products, too. Here's the Giblet mug (click on it to go to that page in my Zazzle shop):


There's another chapter to the Giblet story, but I think I'll save that for the next blog entry, coming soon. For now I'll just say that I LOVED doing this project and I'm definitely planning to stretch my old drawing skill again soon!

I should also add that I showed this drawing to my big sister, a very talented artist (formerly an art director with an advertising firm) and she loved it, too. She thinks I should expand on it and turn it into a line of greeting cards.

What do you think?

Wednesday, October 07, 2009

How to Photograph Reflective Ornaments


Last year when I listed my Pocket Mirror Christmas ornaments in my Etsy shop I was able to hang them on my Christmas tree to take pictures of them. I wanted to list some a little earlier this year, though, and since I don't have my Christmas tree up yet, I had to think of another way to photograph them.

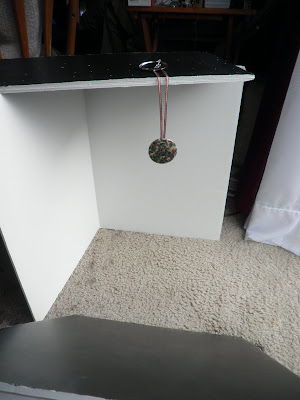
I've detailed in an earlier post my creative solution to product photography with a limited budget and small living space. I started with the same basic plan to shoot in front of the glass door leading to the deck of my town house. I get good, open lighting for several hours of the day there.

I used pieces of foamboard again, standing one scored board on end and laying another one across the top. I grabbed one of my pin-back button parts and stuck it in the top board and draped the ribbon of the ornament over it, letting it hang freely, like this:


Since these ornaments are highly reflective it takes a little creative positioning to compensate for that. I've found that a strategically place black board can take care of the problem. Watch what the light is doing and how the reflection changes as you reposition this black board in front of the item you're shooting, varying the angle as necessary. Don't worry if you have to get a little of the foamboards in the picture because you can crop that out later.


I think these pictures turned out pretty well. What do you think? These ornaments were all made with Christmas print fabrics I've collected. I'll be listing these and others in my Etsy shop soon.